|
|
Take a Tour of TestWorks TestWorking Motifburger |
|
|
Take a Tour of TestWorks TestWorking Motifburger |
TestWorks, a fully integrated suite of software testing tools, will organize and automate your software testing process. TestWorks offers an end-to-end solution that covers all aspects of your process lifecycle: development, execution, management, reporting, organization, call-pair coverage, branch coverage analysis ... more!
TestWorks can be applied to the full spectrum of functions needed for producing quality software quicker, better, and less expensively.
This page shows you a sampling of screens taken from a TestWorks Application Note TestWorking Motifburger.
There are three pre-programmed types of Kiviat charts that take their data
directly from the current metric analysis.
You use the Kiviat chart to identify instances where metrics are "off scale".
Software managers can tell at a glance how well a project is doing.
TestWorks' METRIC can also accept your own programming of the Kiviat Charts.
You need both modes because in practice many applications, e.g. xterm,
don't have Xt-compliance and can't be recorded in ObjectMode in any case.
Synchronizing, validation, and other reference images can be recorded
by CAPBAK/X either as a whole-window, a partial-window, or an ASCII
extraction of the text on a window.
Using "C" as the command language makes it easy to provide advanced programming
within the scripts.
The "C" interpreter knows about #include
The left hand side of the screenshot shows the Status report for the current
test tree, and shows the history report for that same test tree.
These reports show only the data relevant to the part of test tree that you select.
The right hand side shows the Regression Report and the overall Certification Report
for the current test suite.
In this case, note that no every test PASSes or FAILs.
The small "xvmon" windows you see in the upper left are controls for the background
processes.
As you wish you can see what is going on in the background by looking at the entire
virtual screen or looking at just the last-created or top window on the virtual screen.
All of the buttons in the middle of the screen, e.g. Instrument
and Build & Run, are basic steps you might take during
this process.
The other buttons will be explained by the outputs they produce, described
in more detail later.
In this example TCAT has been run on the entire motifburger.c
file, and TCAT has gone ahead and invoked the "C" compiler to produce
an instrumented output file
motifbur.
Whenever we run the instrumented
motifbur
file we get a new test tracefile that is used to accumulate test coverage
data about Motifburger.
The statistics for each tree and for all trees includes the number of links,
the number of caller-callee call-pairs, the total number of modules (functions),
the depth of the tree, and the number of recursive function calls that are made.
If you click on any of the edges in this picture you will see the corresponding
link or call-pair in the source module; and if you click on any of the
names you will move direct to the Digraph display.
If you click on an edge you are pointed to the specific part of the code
that contains that particular edge.
This feature makes it very easy to navigate through your program text.
The statistics that apply for the current function are shown at the right
hand side in the sample,
and include the cyclomatic number and the total path count using the
TestWorks' proprietary apg engine.
The total path count, expressed in terms of the number of paths and their level of iteration,
is very strongly correlated to likelihood of latent defects in the program.
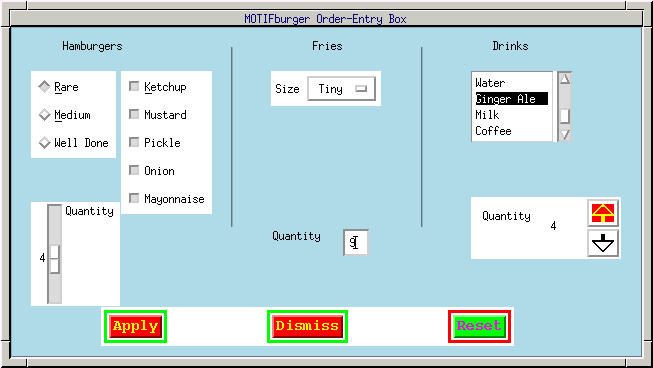 1. Motifburger Screen
This screen shows the GUI for Motifburger compiled on a UNIX platform using Xt.
Note that it includes typical Xt-type objects, slider bars,
push buttons, etc.
Some CAPBAK/X recordings will be made direct from the screen.
And, some CAPBAK/X recordings made in ObjectMode will be based on these objects.
1. Motifburger Screen
This screen shows the GUI for Motifburger compiled on a UNIX platform using Xt.
Note that it includes typical Xt-type objects, slider bars,
push buttons, etc.
Some CAPBAK/X recordings will be made direct from the screen.
And, some CAPBAK/X recordings made in ObjectMode will be based on these objects.
METRIC ANALYSIS STEPS
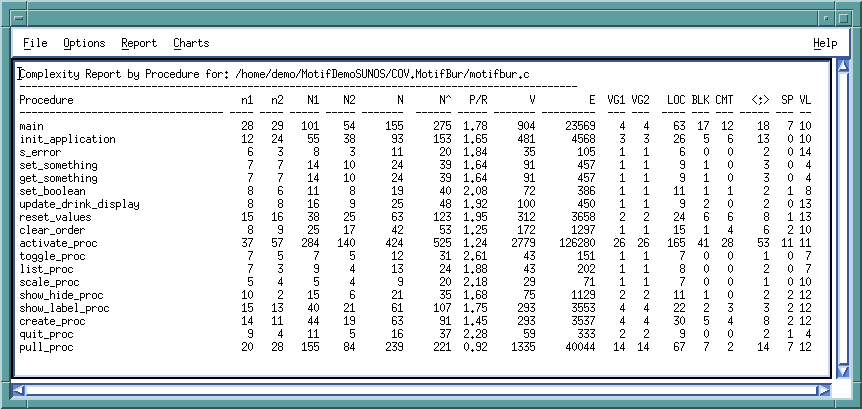 2. METRIC Table Output.
For programs written in C, C++, F77 or Ada you can use the METRIC product
to show all of the standard software metrics.
This screen shows METRIC applied to the motifburger.c file...the source file
that generates the Motifburger example itself.
2. METRIC Table Output.
For programs written in C, C++, F77 or Ada you can use the METRIC product
to show all of the standard software metrics.
This screen shows METRIC applied to the motifburger.c file...the source file
that generates the Motifburger example itself.
See if you can identify any individual functions that are particularly likely to
cause you trouble in the future? Hint: Check for high cyclomatic complexity, VG1 and VG2
in the figure.
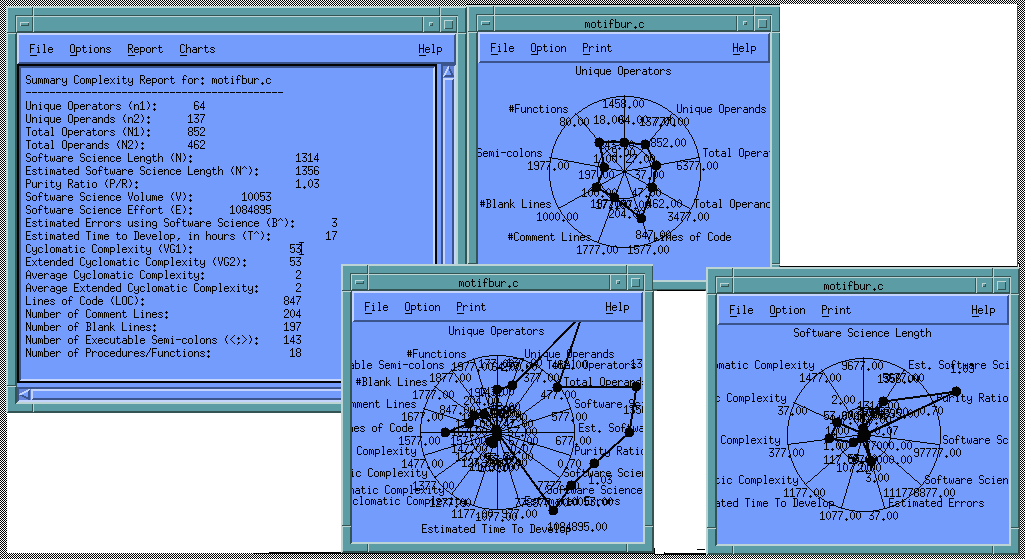 3. METRIC Summary Reports and Kiviat Charts.
In addition to the standard tabular output you can also ask METRIC
to provide you a summary of all of the data in the file or files it has
analyzed (upper left in the screen).
3. METRIC Summary Reports and Kiviat Charts.
In addition to the standard tabular output you can also ask METRIC
to provide you a summary of all of the data in the file or files it has
analyzed (upper left in the screen).
REGRESSION TESTING SUPPORT
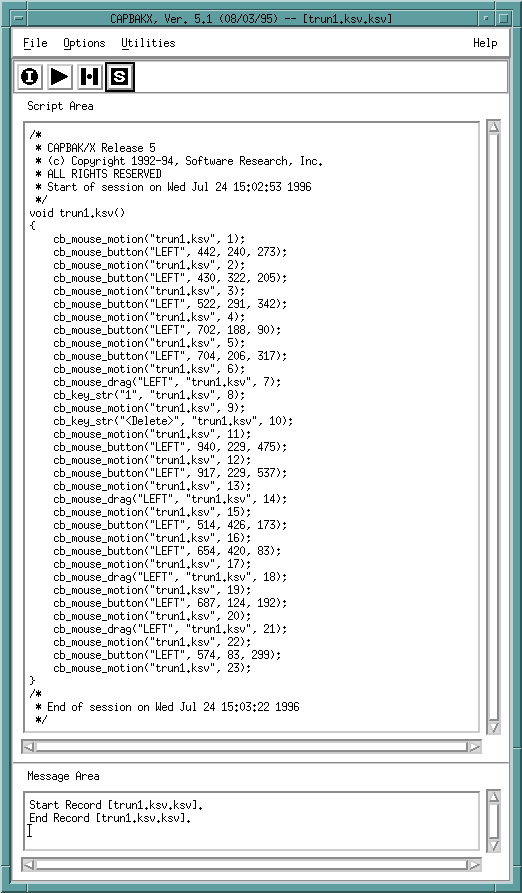
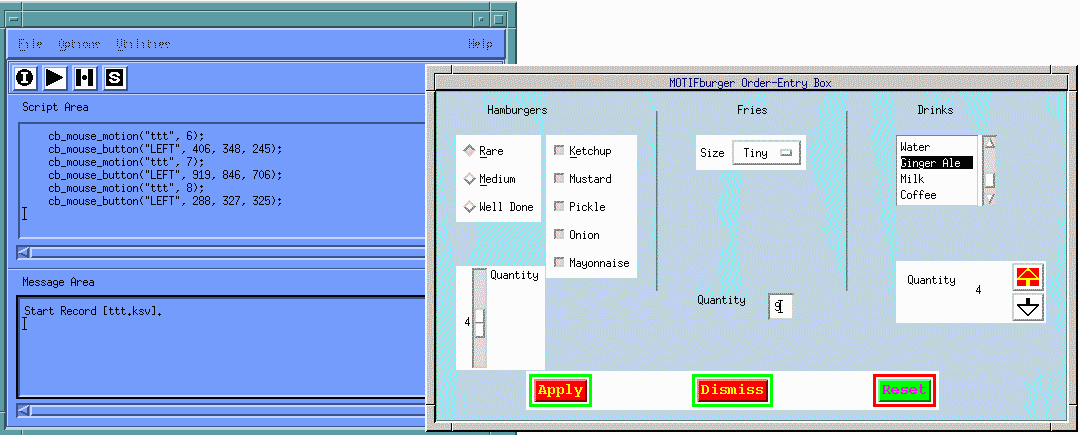 4. CAPBAK/X Recording in TrueTime Mode.
This picture shows the CAPBAK/X GUI as it is used to record a TrueTime mode
session of a tester driving Motifburger's GUI.
Note that the recording is expressed as "C" code in the Script Area portion
of the
CAPBAK/X GUI.
4. CAPBAK/X Recording in TrueTime Mode.
This picture shows the CAPBAK/X GUI as it is used to record a TrueTime mode
session of a tester driving Motifburger's GUI.
Note that the recording is expressed as "C" code in the Script Area portion
of the
CAPBAK/X GUI.
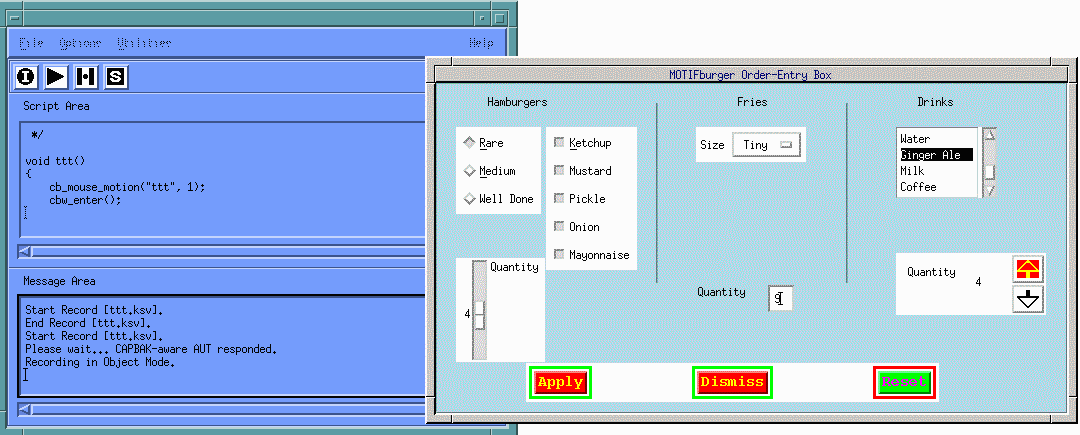 5. CAPBAK/X Recording in ObjectMode.
This picture shows the CAPBAK/X GUI as it is used to record events on
the Motifburger GUI in ObjectMode.
The user can originate recording sessions in either TrueTime or ObjectMode
and can use the function keys or the hotkey pulldown to switch modes at any time.
5. CAPBAK/X Recording in ObjectMode.
This picture shows the CAPBAK/X GUI as it is used to record events on
the Motifburger GUI in ObjectMode.
The user can originate recording sessions in either TrueTime or ObjectMode
and can use the function keys or the hotkey pulldown to switch modes at any time.
 6. CAPBAK/X Playing Back With Automatic Output Synchronization.
Here you see an example of the hotkey pulldown showing all of the
during-recording and during-playback functions.
This screenshot shows the playback process recording an image.
6. CAPBAK/X Playing Back With Automatic Output Synchronization.
Here you see an example of the hotkey pulldown showing all of the
during-recording and during-playback functions.
This screenshot shows the playback process recording an image.
 7. CAPBAK/X Playing Back A Complete Script.
Here is how CAPBAK/X expresses a complete single test: as a complete "C" program.
Playback is accomplished by interpretively executing this "C" program.
7. CAPBAK/X Playing Back A Complete Script.
Here is how CAPBAK/X expresses a complete single test: as a complete "C" program.
Playback is accomplished by interpretively executing this "C" program.
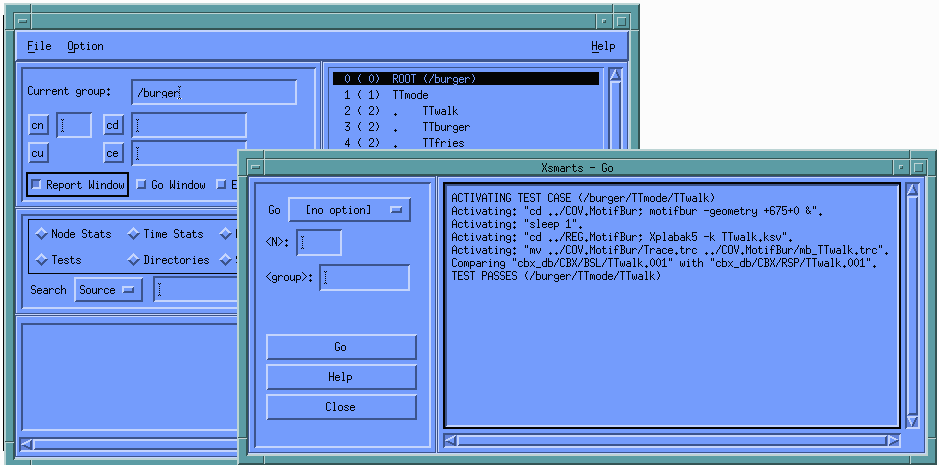 8. SMARTS Running CAPBAK/X Playbacks
Here we have set up SMARTS, TestWorks' regression suite controller, to run
a series of tests that have been previously recorded with CAPBAK/X.
The output on the right shows the SMARTS' "GO" window as tests are run,
outputs are compared, and tests either PASS or FAIL.
8. SMARTS Running CAPBAK/X Playbacks
Here we have set up SMARTS, TestWorks' regression suite controller, to run
a series of tests that have been previously recorded with CAPBAK/X.
The output on the right shows the SMARTS' "GO" window as tests are run,
outputs are compared, and tests either PASS or FAIL.
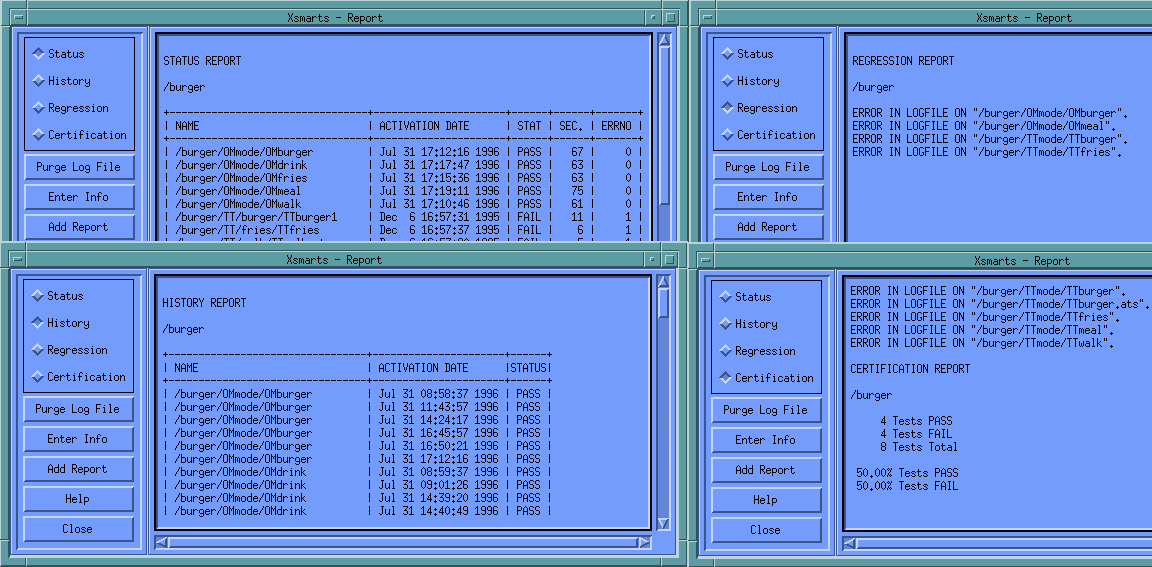 9. SMARTS Test Reporting Summaries
SMARTS keeps a record of tests and shows when tests ran, how they concluded,
and which tests "regressed" (i.e. previously PASSed or FAILed and now FAIL or PASS).
9. SMARTS Test Reporting Summaries
SMARTS keeps a record of tests and shows when tests ran, how they concluded,
and which tests "regressed" (i.e. previously PASSed or FAILed and now FAIL or PASS).
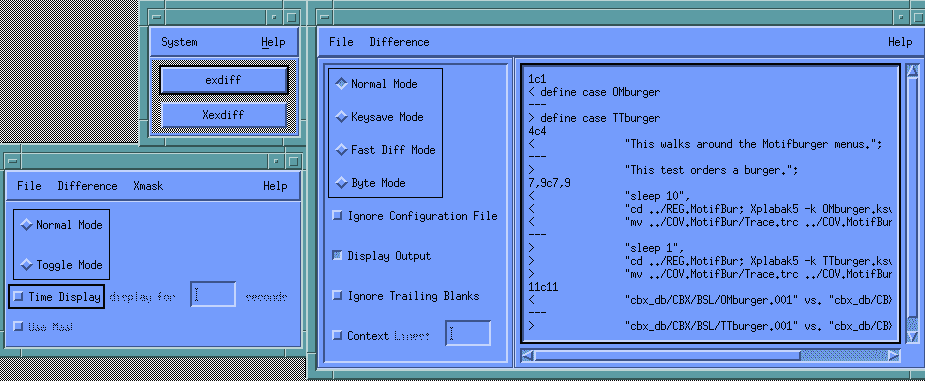
 10. EXDIFF Programmed To Detect Changes in Graphics Mode
Here you see two full-screenshots of Motifburger, and how EXDIFF lets you
examine if these differ or are the same.
EXDIFF can be programmed by adding masks that disregard areas where differences are expected.
10. EXDIFF Programmed To Detect Changes in Graphics Mode
Here you see two full-screenshots of Motifburger, and how EXDIFF lets you
examine if these differ or are the same.
EXDIFF can be programmed by adding masks that disregard areas where differences are expected.
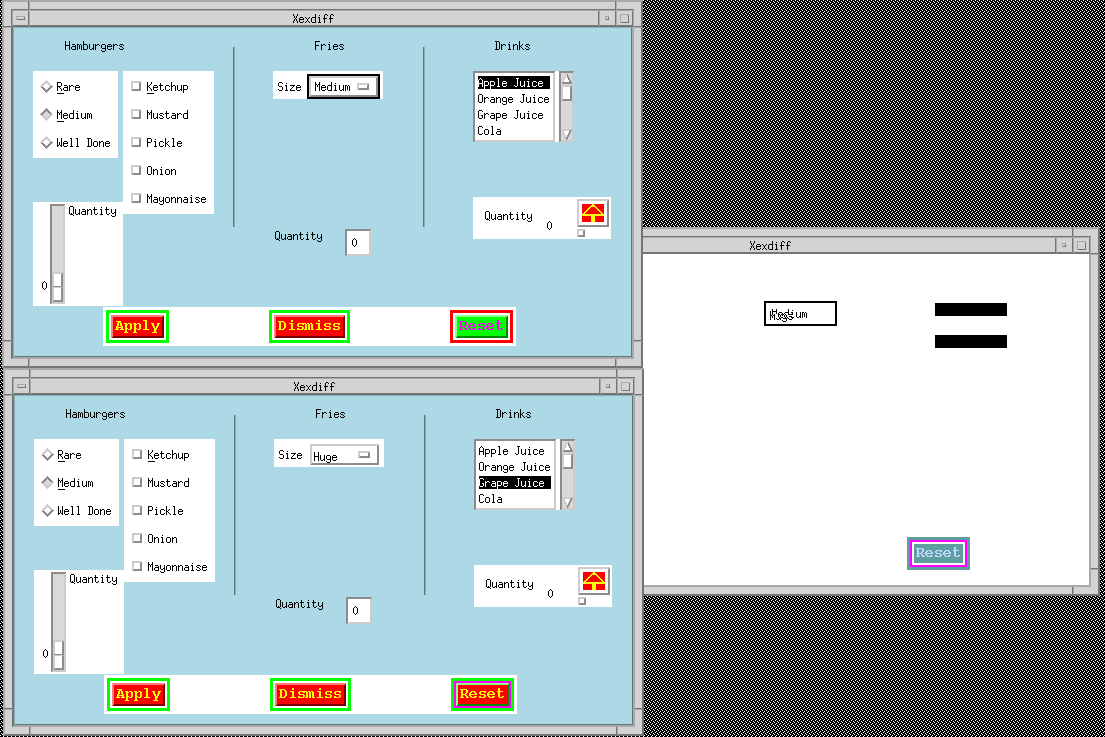
 11. EXDIFF Detects Changes in ASCII Mode
The other EXDIFF mode is illustrated here.
If you look in the prior picture you see that one order is for a "Huge" size and
the other is for an "Medium" size.
Here we've used the ASCII extraction capability of CAPBAK/X's built-in OCR engine
the retrieve the text from the selected region of the screen,
and then sent the texts to EXDIFF (in ASCII mode) to show that, indeed, they
are different.
11. EXDIFF Detects Changes in ASCII Mode
The other EXDIFF mode is illustrated here.
If you look in the prior picture you see that one order is for a "Huge" size and
the other is for an "Medium" size.
Here we've used the ASCII extraction capability of CAPBAK/X's built-in OCR engine
the retrieve the text from the selected region of the screen,
and then sent the texts to EXDIFF (in ASCII mode) to show that, indeed, they
are different.
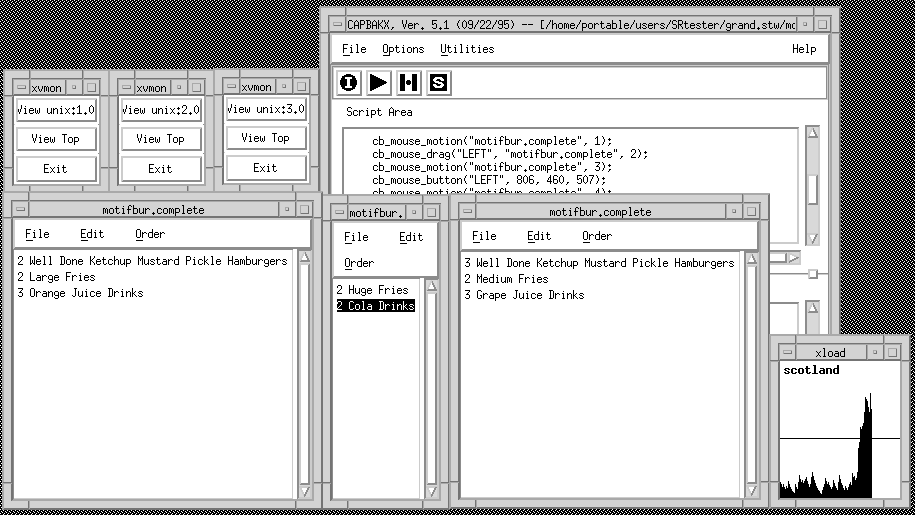 12. Load Generation with Xvirtual
CAPBAK/X comes with a built in Xvirtual system to let you play back multiple
sessions from one screen.
Here you see three sessions running in parallel in the background and one session
running in the foreground.
The xload graph on the lower right hand side shows how the load is
rapidly increasing as all of these four simultaneous playbacks start to
impose a greater and greater burden on the computer.
12. Load Generation with Xvirtual
CAPBAK/X comes with a built in Xvirtual system to let you play back multiple
sessions from one screen.
Here you see three sessions running in parallel in the background and one session
running in the foreground.
The xload graph on the lower right hand side shows how the load is
rapidly increasing as all of these four simultaneous playbacks start to
impose a greater and greater burden on the computer.
COVERAGE TESTING SUPPORT
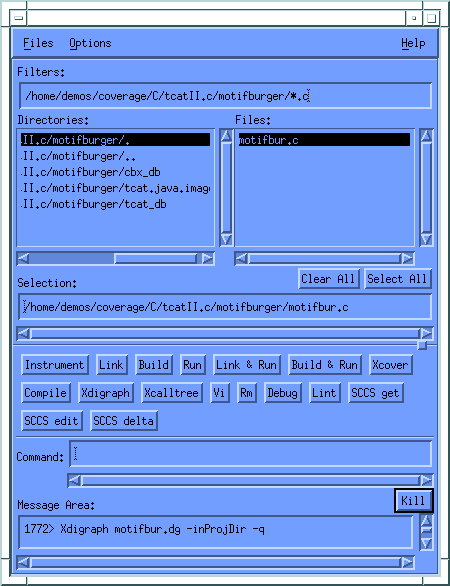 13. TCAT C/C++ Main Control GUI
This is the main control GUI for the TCAT C/C++ product.
The aim of this GUI is to wrap around your software build process so that you
can easily and effectively run tests, collect coverage data, and use the
coverage data as a feedback loop to increase your test coverage.
13. TCAT C/C++ Main Control GUI
This is the main control GUI for the TCAT C/C++ product.
The aim of this GUI is to wrap around your software build process so that you
can easily and effectively run tests, collect coverage data, and use the
coverage data as a feedback loop to increase your test coverage.
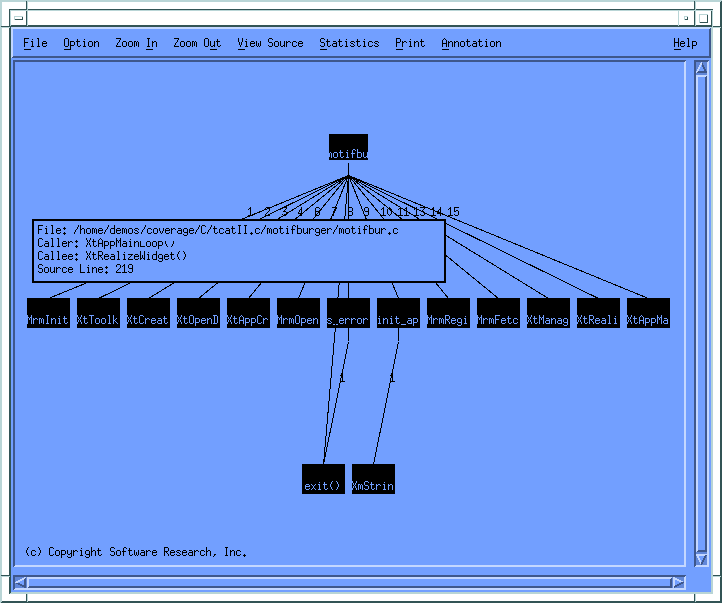 14. TCAT's Calltree Display With Source Viewing.
Here is one (of several) roots and subsequent calltrees for Motifburger.
In this case we've clicked on a particular function name and we're shown the source
code of the function as it is seen by the user.
14. TCAT's Calltree Display With Source Viewing.
Here is one (of several) roots and subsequent calltrees for Motifburger.
In this case we've clicked on a particular function name and we're shown the source
code of the function as it is seen by the user.
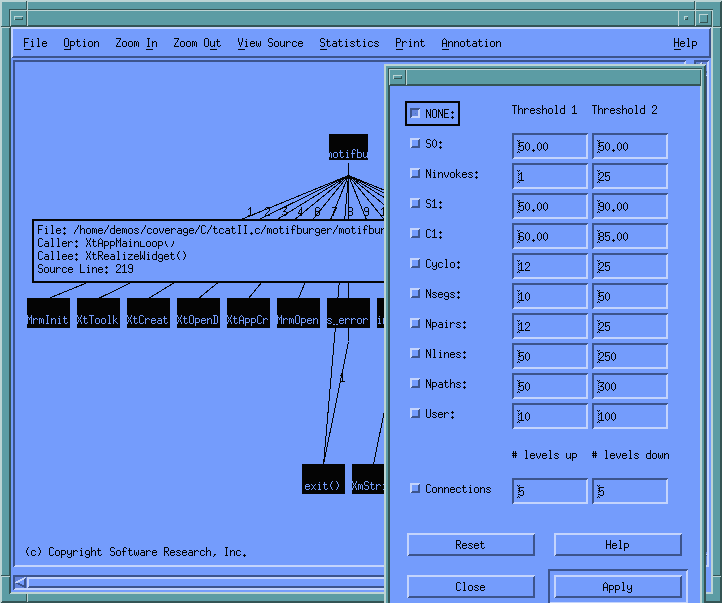 15. TCAT's Annotatable Calltree Display.
You have many options in how to color this tree, shown at the right hand side
of this picture.
For example, you can label the tree in color based on whether or not the
accumulated module coverage (S0 metric) is above or below the 50% level
as is shown in the right hand side.
15. TCAT's Annotatable Calltree Display.
You have many options in how to color this tree, shown at the right hand side
of this picture.
For example, you can label the tree in color based on whether or not the
accumulated module coverage (S0 metric) is above or below the 50% level
as is shown in the right hand side.
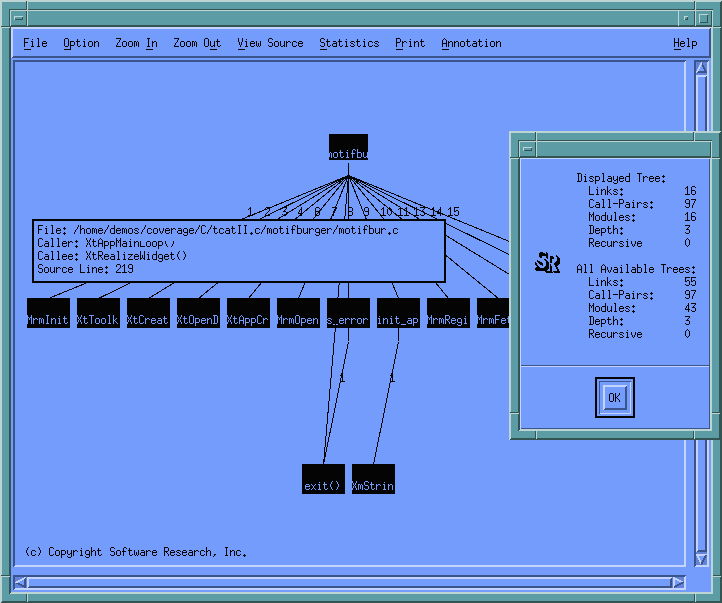 16. TCAT's Calltree Statistics.
Here is the report you get from TCAT's Calltree diagram about properties of the
call trees that it knows about.
There can be multiple trees in one file, but in this case there is just one.
16. TCAT's Calltree Statistics.
Here is the report you get from TCAT's Calltree diagram about properties of the
call trees that it knows about.
There can be multiple trees in one file, but in this case there is just one.
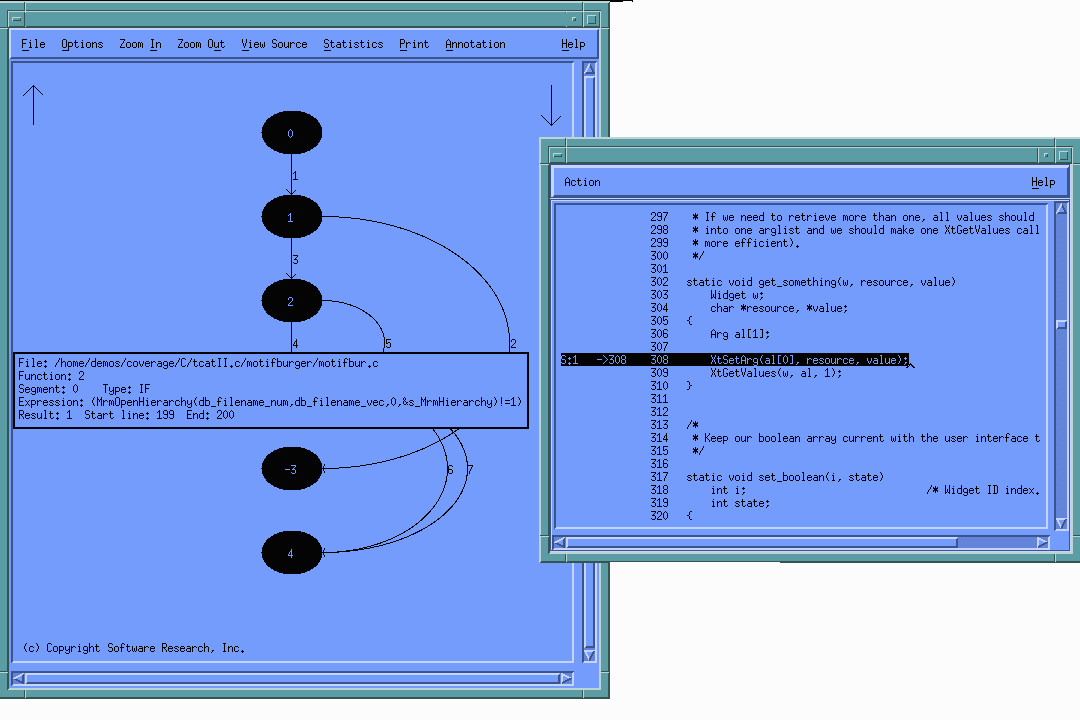 17. TCAT's Digraph Display with Source Viewing.
Here TCAT's Digraph display shows a diagram that shows the control
structure of the function.
Nodes are "states" or places in the program; edges between the nodes
are sequences of statements.
For example, and if statement, like the one at node 3, goes through
two different routes.
17. TCAT's Digraph Display with Source Viewing.
Here TCAT's Digraph display shows a diagram that shows the control
structure of the function.
Nodes are "states" or places in the program; edges between the nodes
are sequences of statements.
For example, and if statement, like the one at node 3, goes through
two different routes.
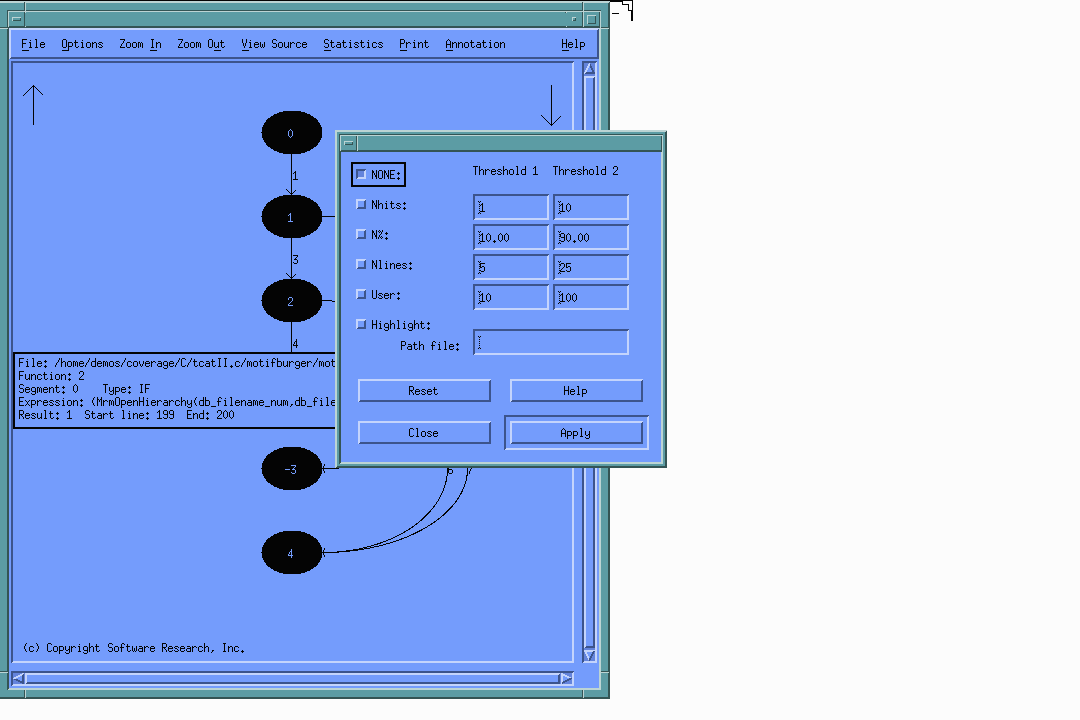 18. TCAT's Digraph Display with Annotation.
You can annotate this digraph display based on a number of quantities that
relate to how well you've done your testing.
The options available are shown at the right hand side.
18. TCAT's Digraph Display with Annotation.
You can annotate this digraph display based on a number of quantities that
relate to how well you've done your testing.
The options available are shown at the right hand side.
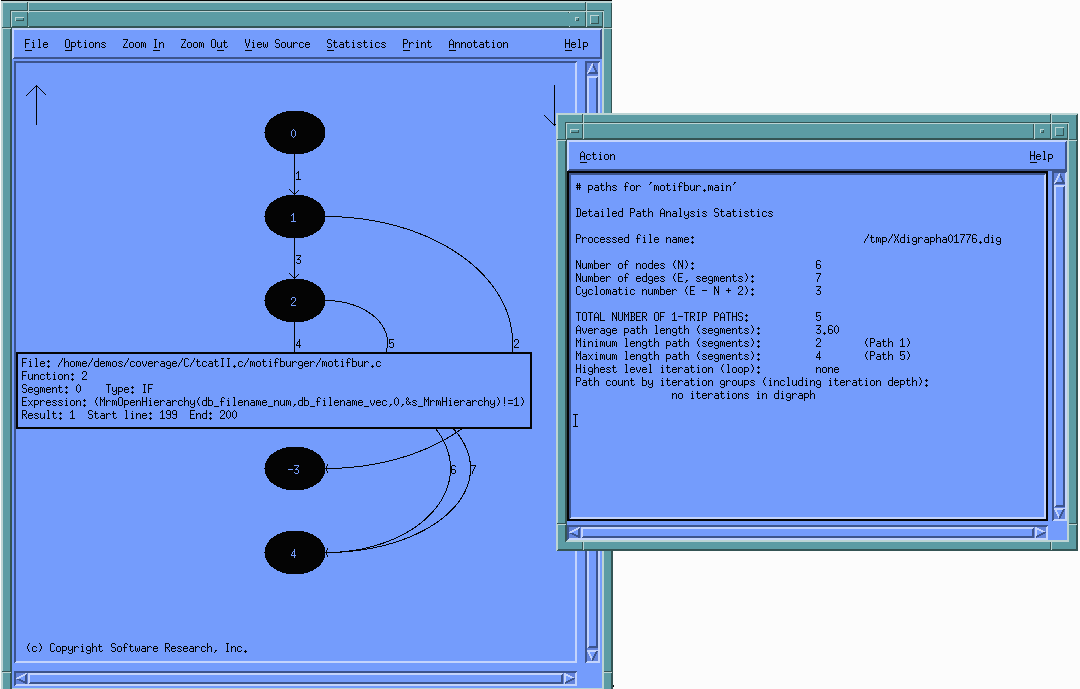 19. TCAT's Digraph Statistics.
A unique feature of TCAT is the ability to compute detailed path oriented statistics
for individual functions, using the Statistics button on the menu bar.
19. TCAT's Digraph Statistics.
A unique feature of TCAT is the ability to compute detailed path oriented statistics
for individual functions, using the Statistics button on the menu bar.
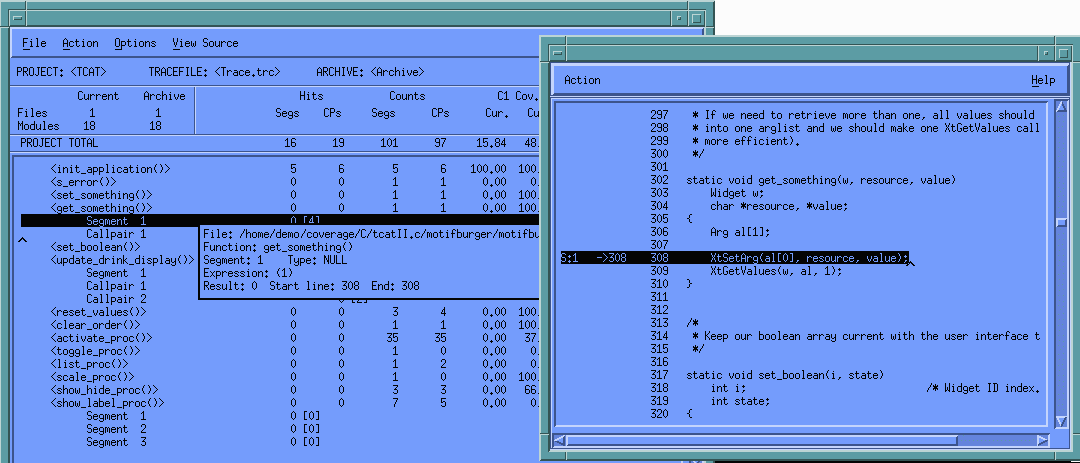 20. TCAT's Coverage Report.
Here is the workhorse coverage reporter for TCAT.
Coverage values, shown in the left hand side of the picture, are given in terms
of files, functions, segments and/or call-pairs.
If you click on a function or a segment or a call-pair on the coverage report
you are taken directly to the source code for that function, segment, or callpair.
20. TCAT's Coverage Report.
Here is the workhorse coverage reporter for TCAT.
Coverage values, shown in the left hand side of the picture, are given in terms
of files, functions, segments and/or call-pairs.
If you click on a function or a segment or a call-pair on the coverage report
you are taken directly to the source code for that function, segment, or callpair.
TEST DATA GENERATION SUPPORT
